CBM - Mentor Administration Team
- Getting Started with Mentor Applicant Review
- Finding Mentor Applications to Review
- Reviewing a Candidate Application
- Moving a Candidate Through the Process
- Declining an Application
- After Approval — What Happens Next
- Dormant Mentors
- Getting Help and Next Steps
Getting Started with Mentor Applicant Review
Who this guide is for. This guide is for the CBM Mentor Applicant Review Team, and it assumes you’ve already read the CRM Introduction — so you know what Contacts and Companies are, how to sign in and navigate, and that what you can see is governed by your User account security. This guide picks up from there and walks you through what the Mentor Review Team does.
The Mentor Review Team reviews applicants who have applied to become CBM mentors and walks each application through the review process — from first look to a decision to approve or decline. You’re the bridge between someone expressing interest in mentoring and that person becoming an active, fully trained CBM mentor, available to work with clients.
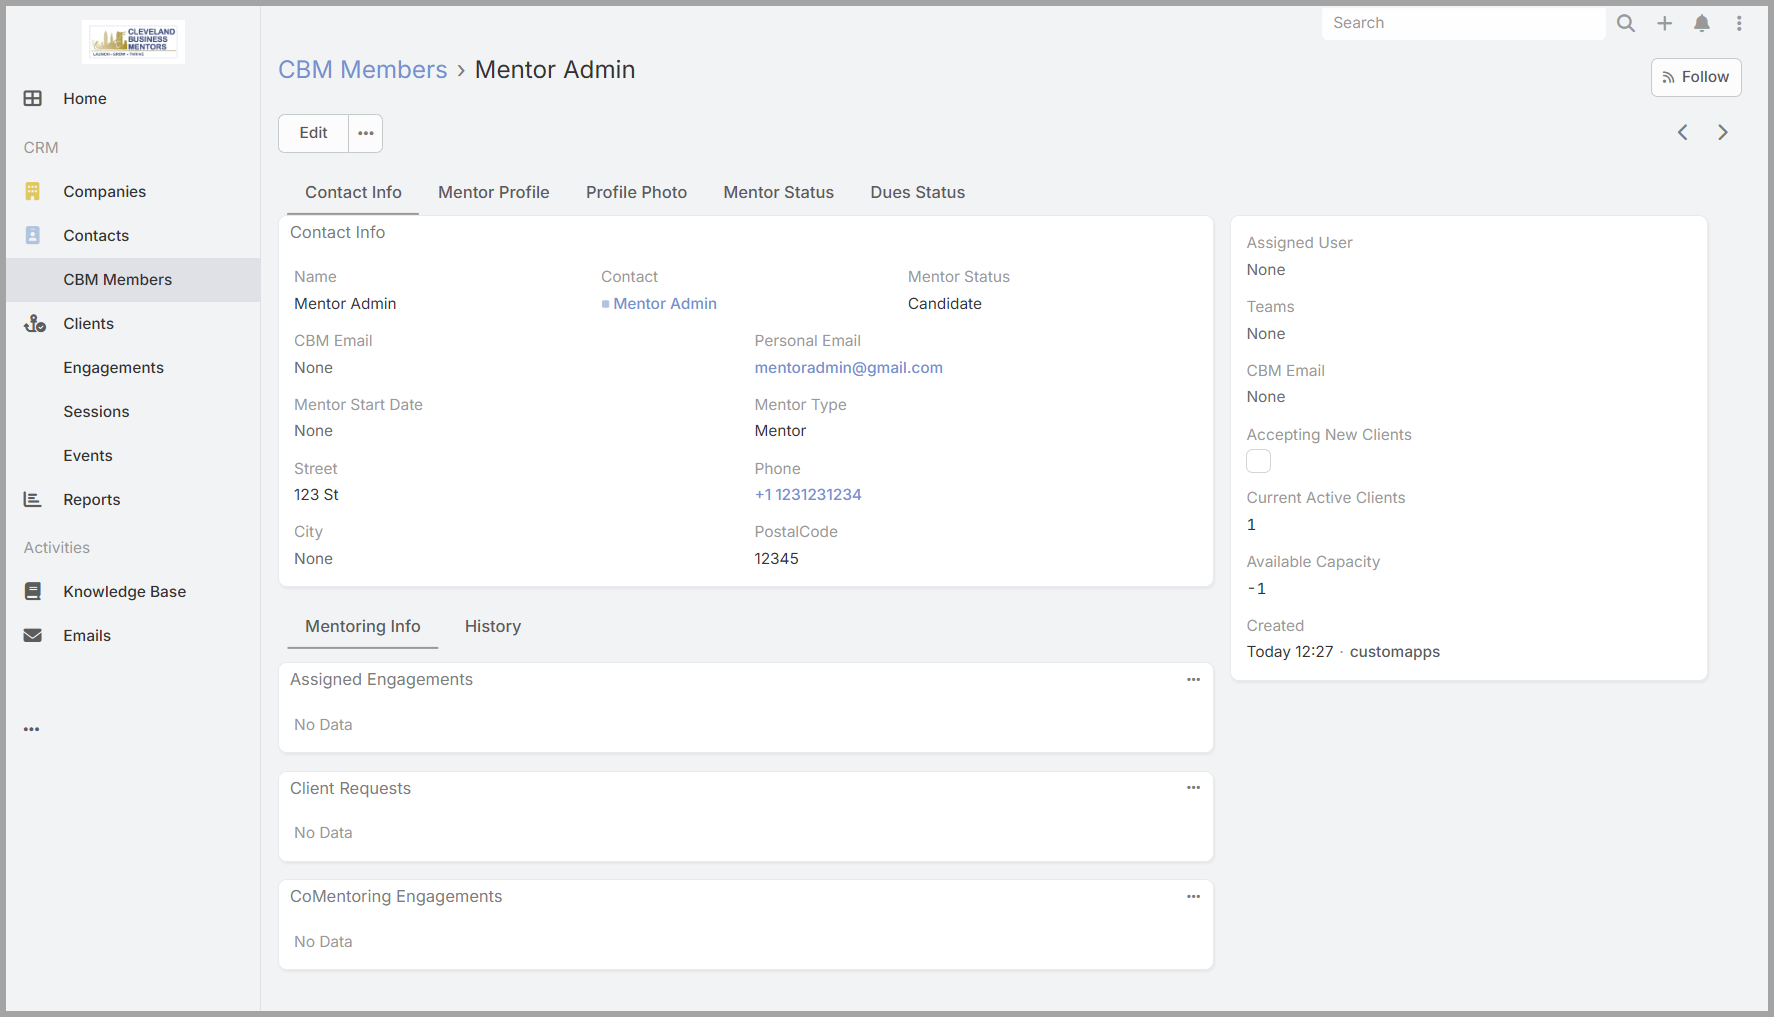
Prospective mentors apply through a form on the CBM public website. When someone submits the form, the system automatically creates two records: a Contact (the person’s file) and a CBM Member record with a Mentor Status of Candidate. You don’t create these by hand — they arrive in your queue ready to review.
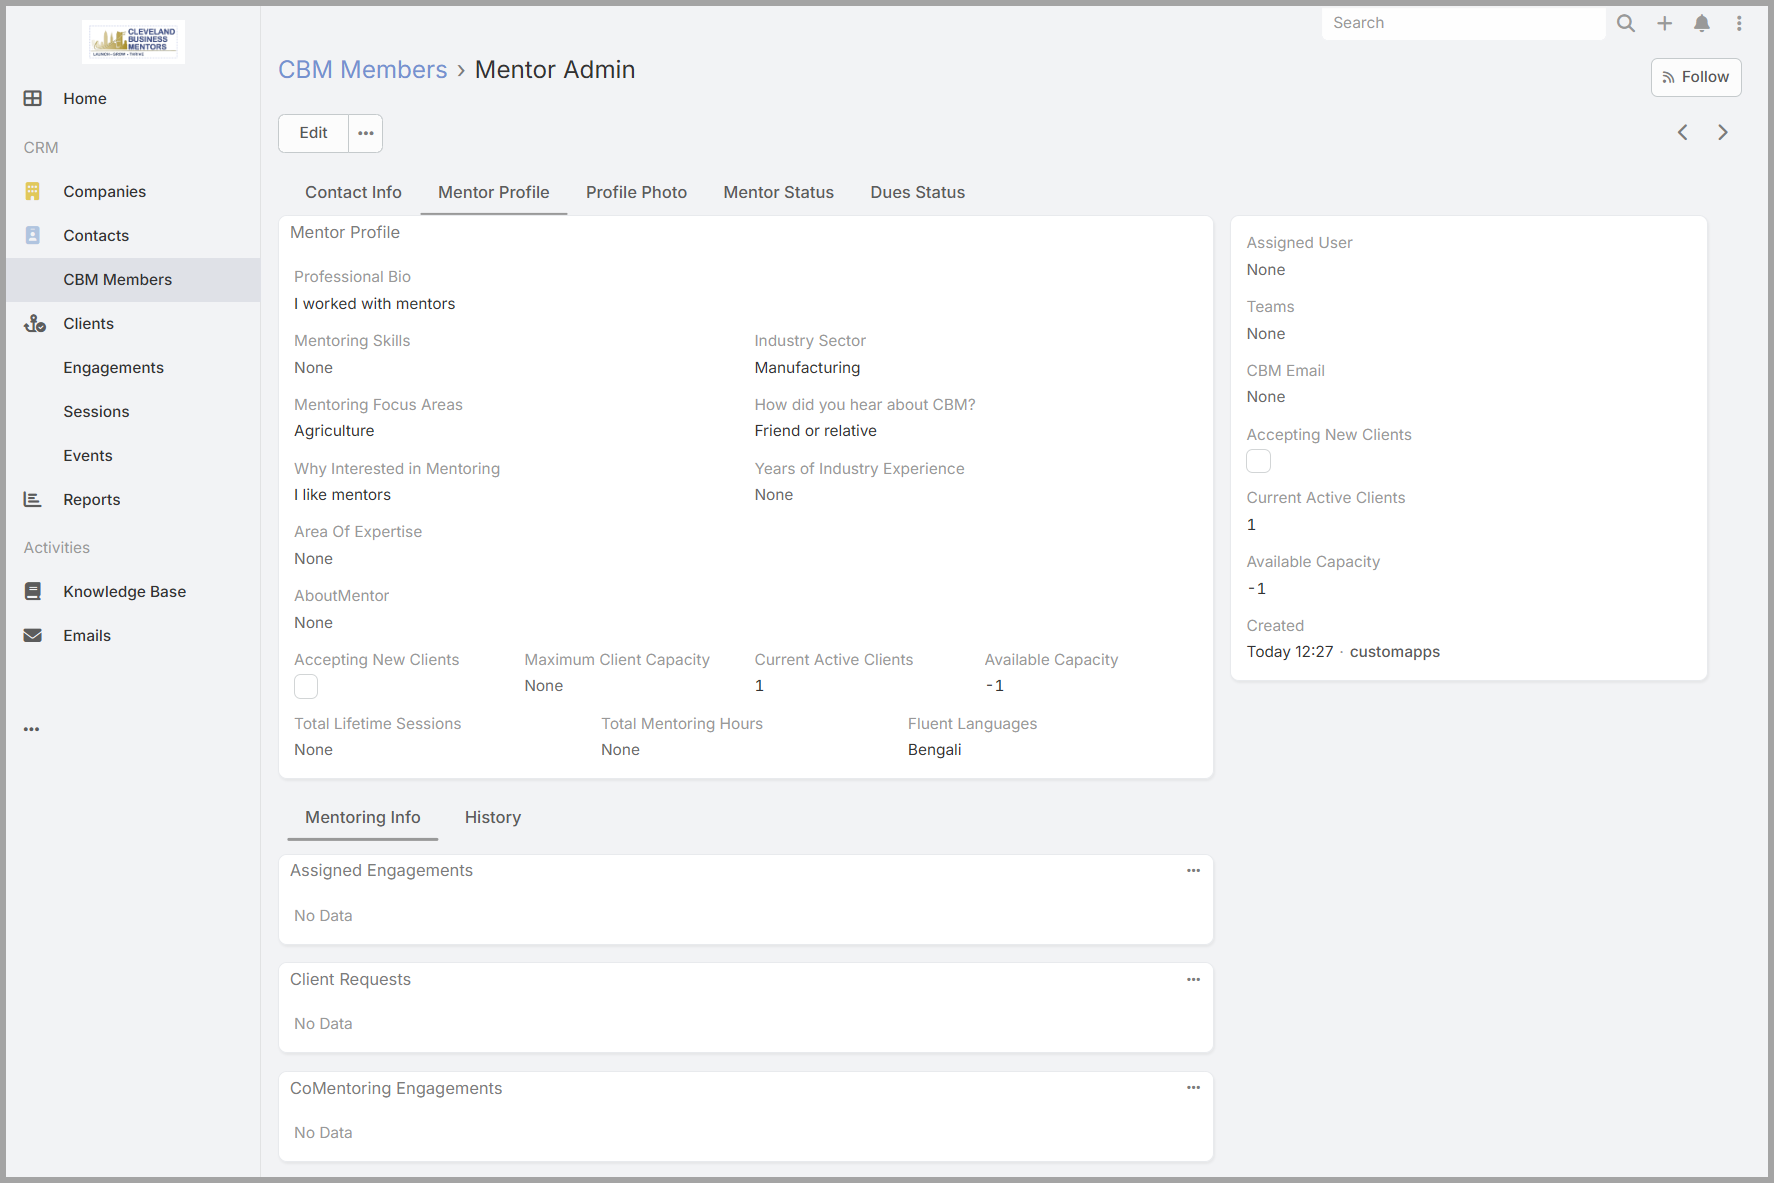
The CBM Member record carries a number of tabs that contain the applicant’s information submitted on the electronic form. The Mentor Profile tab is where most of the application details live: the candidate’s Professional Bio, Mentoring Skills, Area of Expertise, Industry Sector, Mentoring Focus Areas, and other information they submitted. This is what you’ll read and evaluate when you review an application.
You access the CRM the same way as any user — see “Signing In” in the Introduction. The work in this guide requires Mentor Administration Team permissions — only users set up with that access will see the dashlet and be able to update Mentor Status and related fields. If you’re ever unable to sign in, can’t see the dashlet, or believe your access isn’t set up correctly, contact [SupportContact] [contact method to be added].
Finding Mentor Applications to Review
There are two places to find a list of Pending Mentor Candidates: Reports, or the CBM Membors Panel.
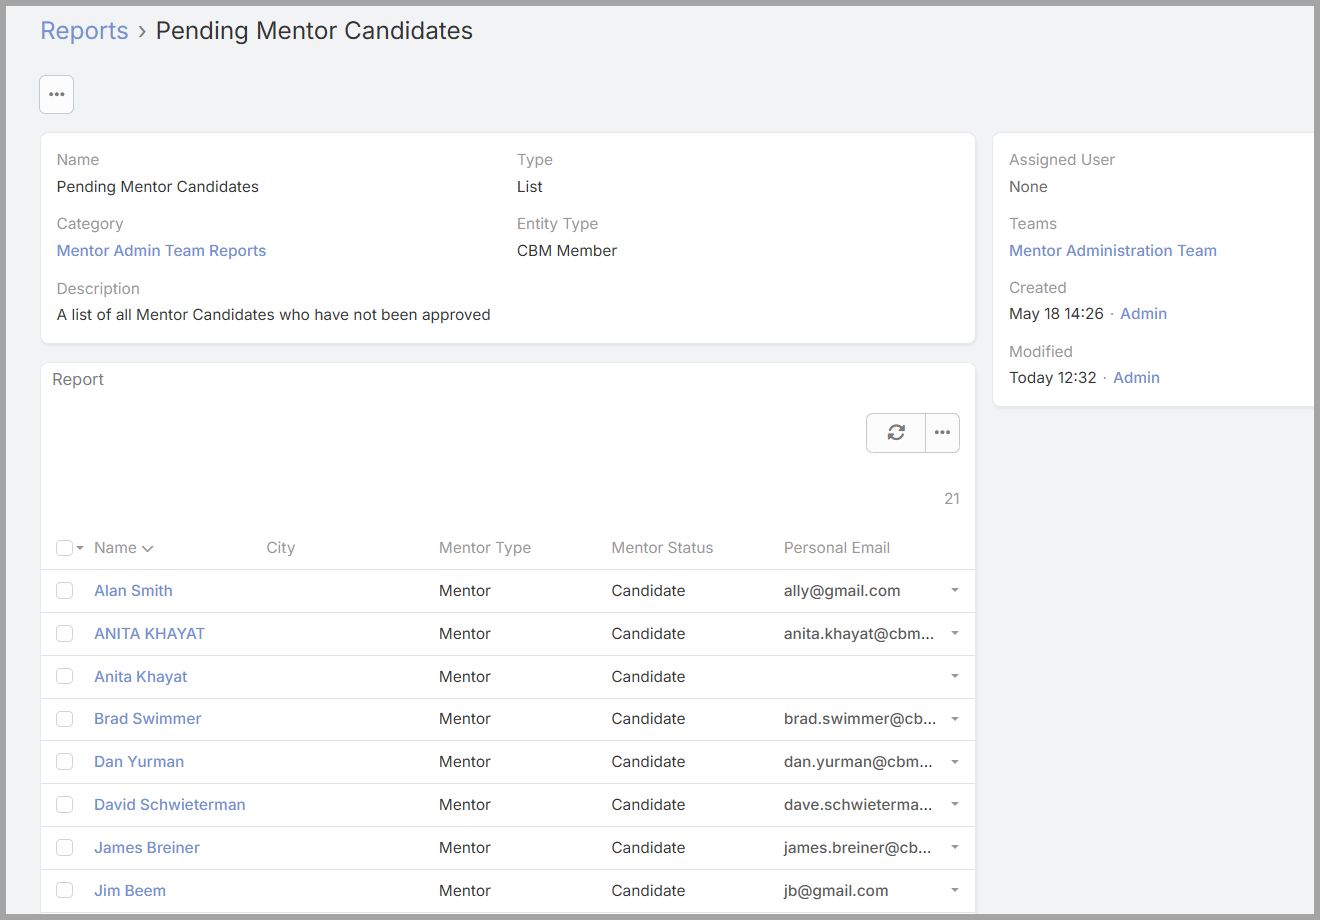
The Pending Mentor Candidates Report
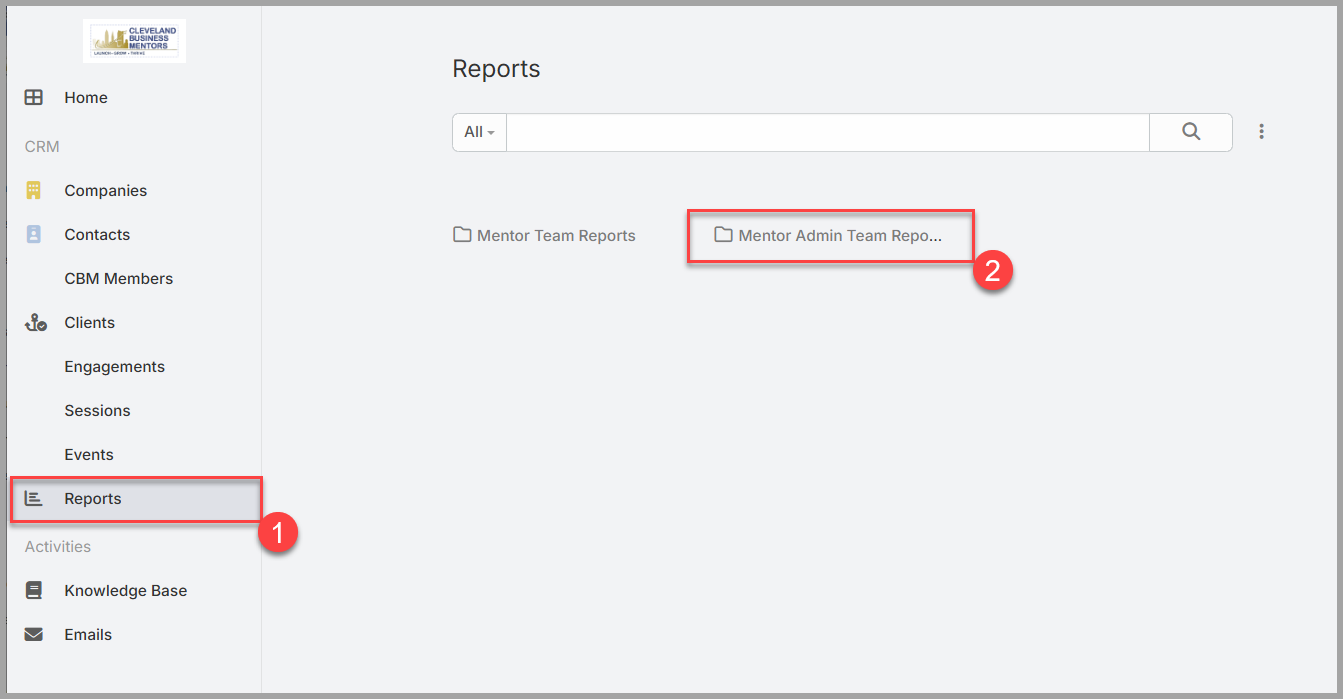
The Reports page provides a number of reports that may be useful, and they are pre-configured to show all Pending Mentor candidates. To access the Pending Mentor Candidate report:
- Click on the Reports link on the left side of your screen.
- Select the Folder “Mentor Admin Team Reports”
- Click on “Pending Mentor Candidates” to display the report.
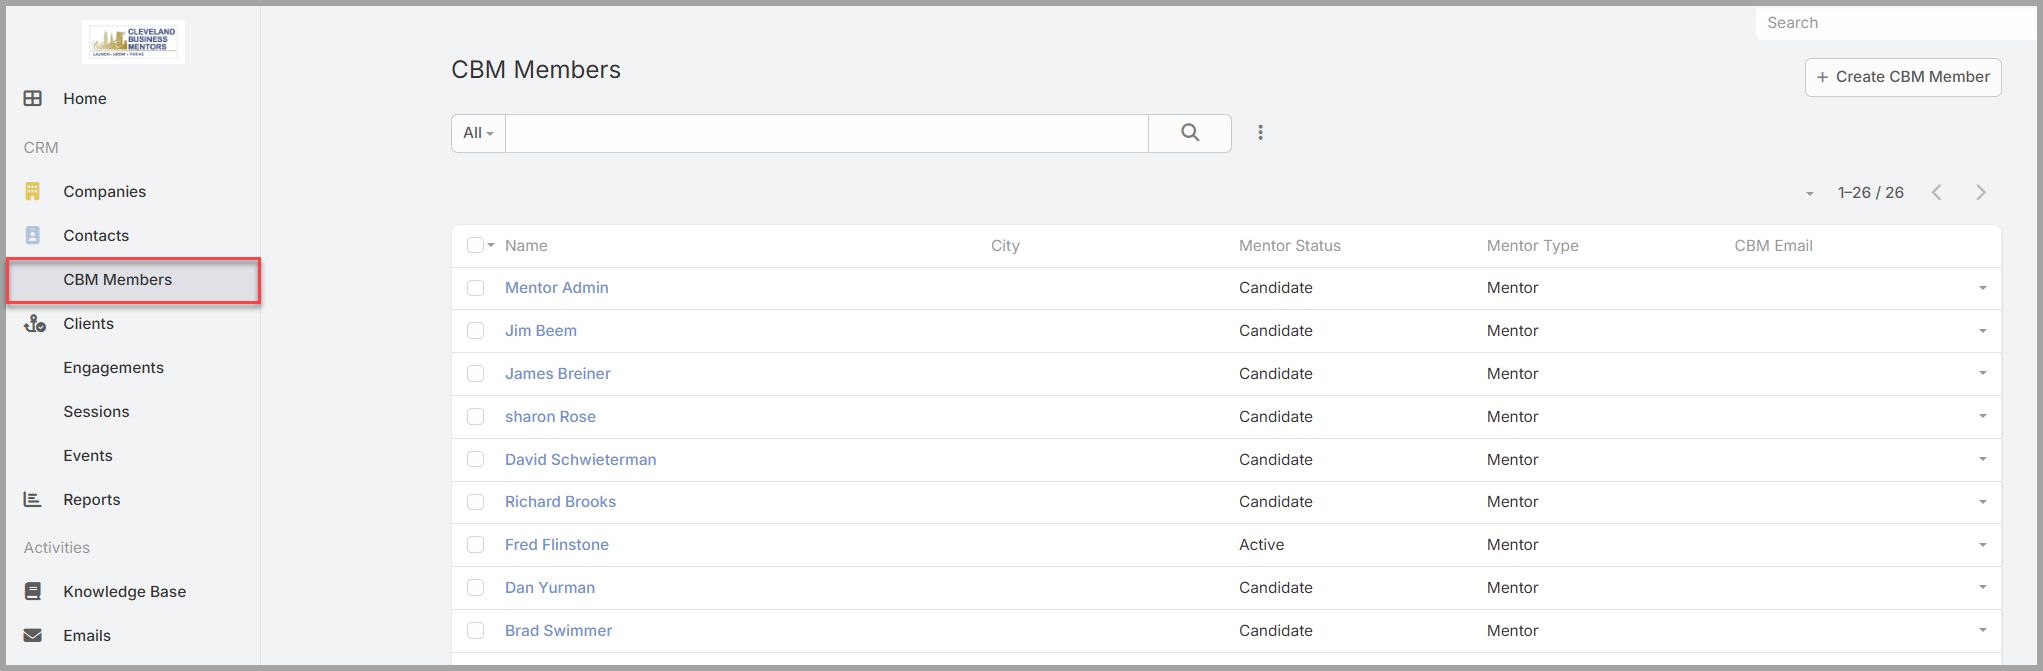
The CBM Members List
The CBM Members list shows a list of all members including Candidates and can also be used to review new Mentors. It also provides user filtering and searching if you are looking for a specific Mentor or Candidate.
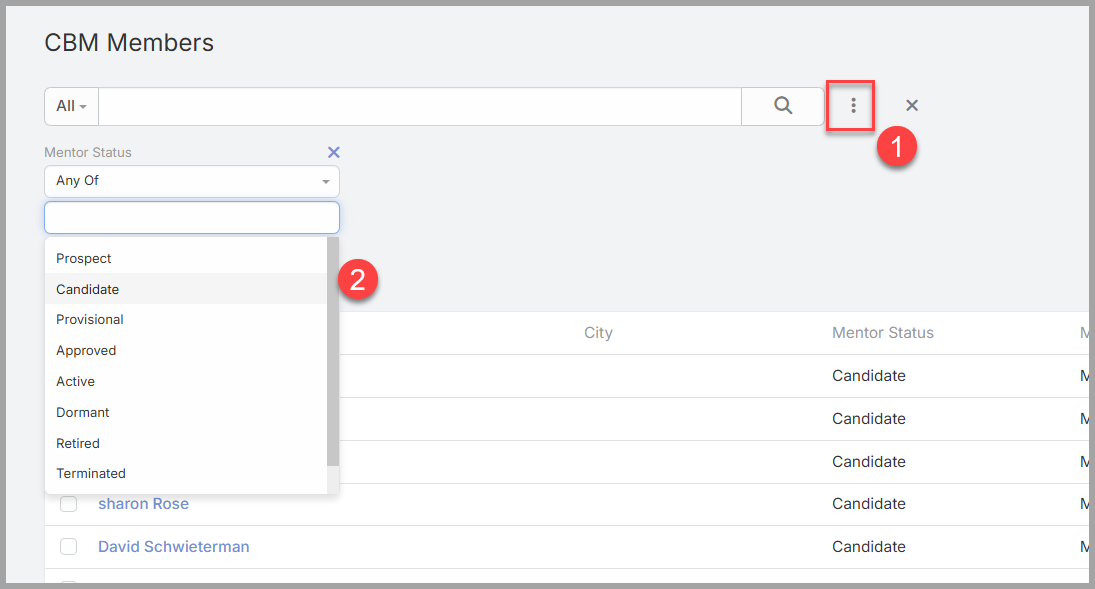
Searching and filtering.
If you want to filter the Member list on one or more Mentor status, you can use the filtering tool. Click on the “three dot menu” (1) and select the filed you would like to use in your filter.
Then select one or more status values from the drop down list.
Regardless of what method you use, once you locate the Mentor Candidate that you would like to review, simply click on the Mentor Name to display the details.
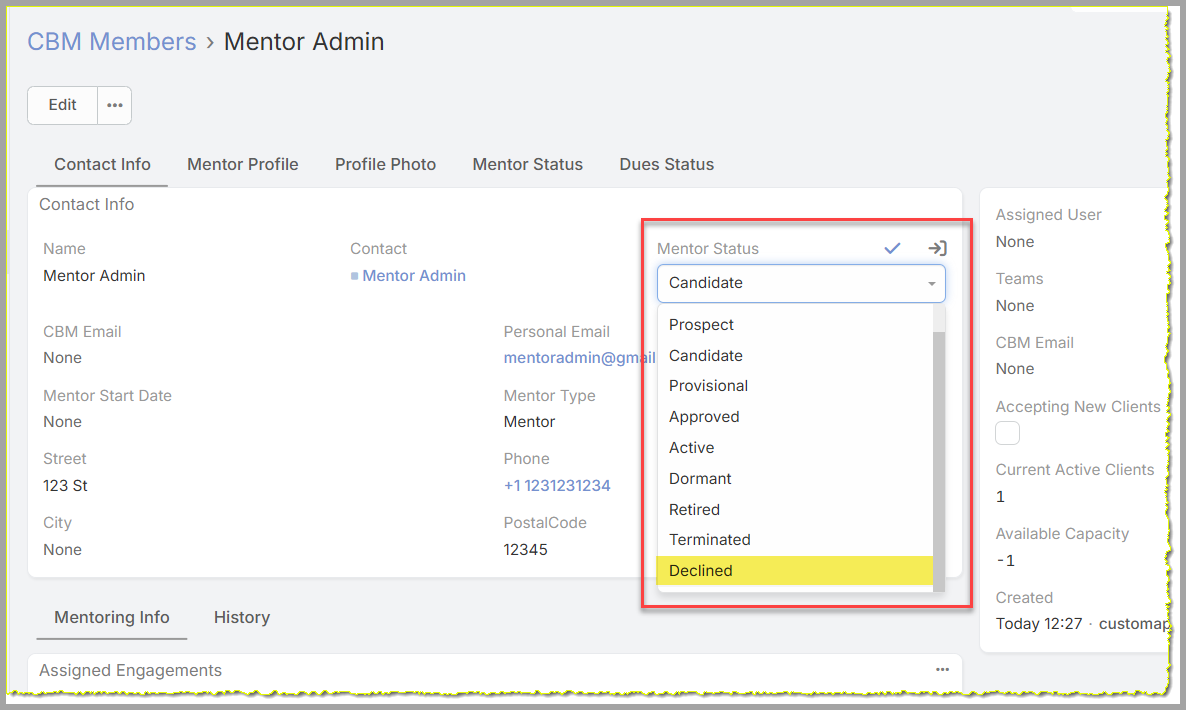
Mentor Status Values
The following list describes each Mentor status and its meaning.
- Candidate— A new application has arrived. The person has submitted the website form but the Mentor Review Team has not begun the review process.
- Under Review —The new applicant has begun the review process, but has not yet been granted a Provisional approval.
- Provisional— The application has passed an initial review and is moving through the on-boarding process before a final approval is granted.
- Approved— The candidate has been accepted and has completed on-boarding training, but is not yet ready for solo mentoring.
- Active— The candidate has been approved and is ready to provide solo mentoring services.
- Dormant— A mentor who was previously Active has become inactive. Dormant records may surface in your queue when a re-evaluation or reactivation decision is needed.
- Retired— The previously active mentor has decided to retire and is no longer accepting new Clients.
- Terminated— The Active Candidate has been Terminated for some type of Breach of Ethics or Terms and Conditions.
- Declined— the candidate application was declined.
There are four Mentor Status values that should be actively reviewed by the Mentor Review Team:
- Candidate
- Under Review
- Provisional
- Approved
- Dormant
Reviewing a Candidate Application
Opening the Mentor application. Once you have selected a Mentor to review, open their CBM Member record by clicking on their name.
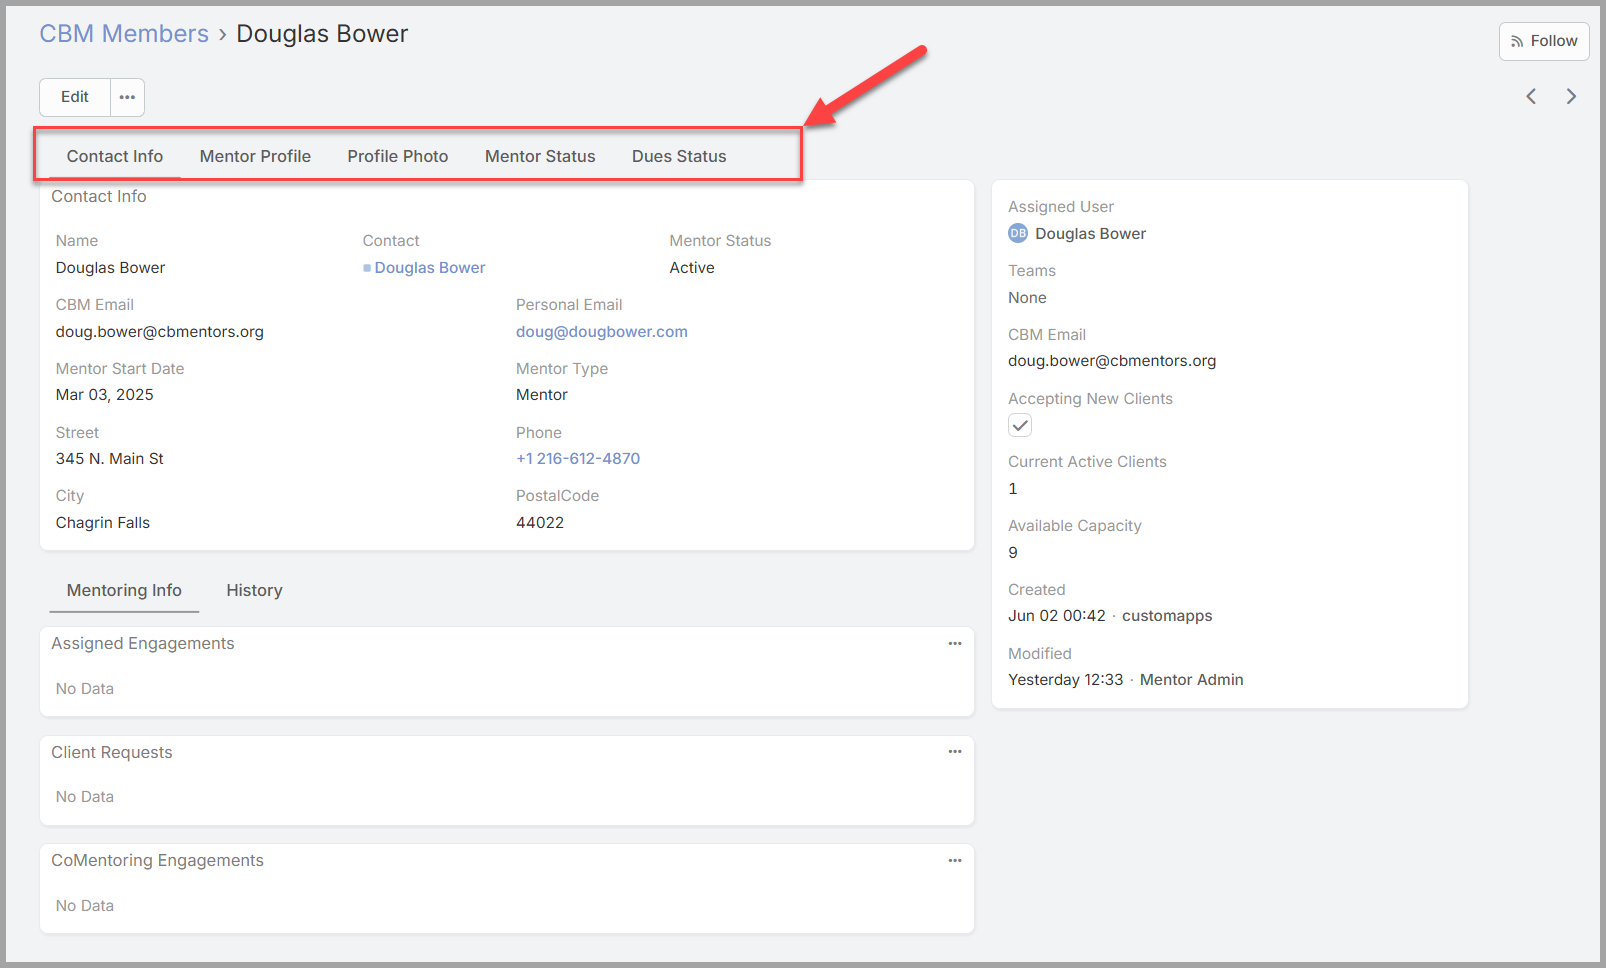
The CBM Member detail form segments the data about the member into tabs across the top of the page. Members of the Mentor Review Team can see additional tabs that other CBM Users cannot. Specifically the Mentor Status and Dues Status Pages.
The Contact Information tab shows the person’s name and contact details from their Contact record. The Mentor Application information is stored on the Mentor Profile tab — select it to see what the candidate submitted.
What to look at. There’s no scoring sheet or checklist — the review is a judgment call based on what the candidate has shared. The fields that matter most are:
- Professional Bio— does the candidate have a credible professional background that would serve CBM clients well?
- Area of Expertise— does their expertise align with the kinds of help CBM clients need?
- Mentoring Skills— have they described relevant skills or experience that would make them an effective mentor?
- Industry Sector and Mentoring Focus Areas— do these fill a gap in CBM’s current mentor roster, or strengthen an area already well covered?
- Why Interested in Mentoring and How Did You Hear About CBM— useful context for understanding the candidate’s motivation and how they found their way to CBM.
Taking notes during review. If you want to record observations or questions as you work through an application, use the Mentor Status Notes field on the Mentor Status tab. These notes are not generally visible to other members outside of the Mentor Review Team, but may be visible in some circumstances.
Moving a Candidate Through the Process
The status progression. Your team moves each candidate through a sequence of statuses as the review advances. The full path from application to approval is:
Candidate → Under Review→ Provisional → Approved→Active
Each step is a manual status change you make on the CBM Member record. There are no automated transitions — every move is your team’s deliberate decision.
Advancing the status. To move a candidate to the next status:
- Open the CBM Member record from the dashlet or from the CBM Members list.
- Select Edit.
- Find the Mentor Status field and change it to the appropriate next value.
- Select Save.
The record updates immediately and the change is recorded in the Stream.
What each step means.
- Candidate → Under Review.The application has passed your initial review and is moving forward. Use this when you’re satisfied with what the candidate submitted but want a further evaluation step — a second review, a conversation, or additional consideration — before making a final decision.
- Under Review → Provisional .The application has passed further review, and the Mentor Candidate has been granted Provisional status to do co-mentoring and complete the required training to be approved.
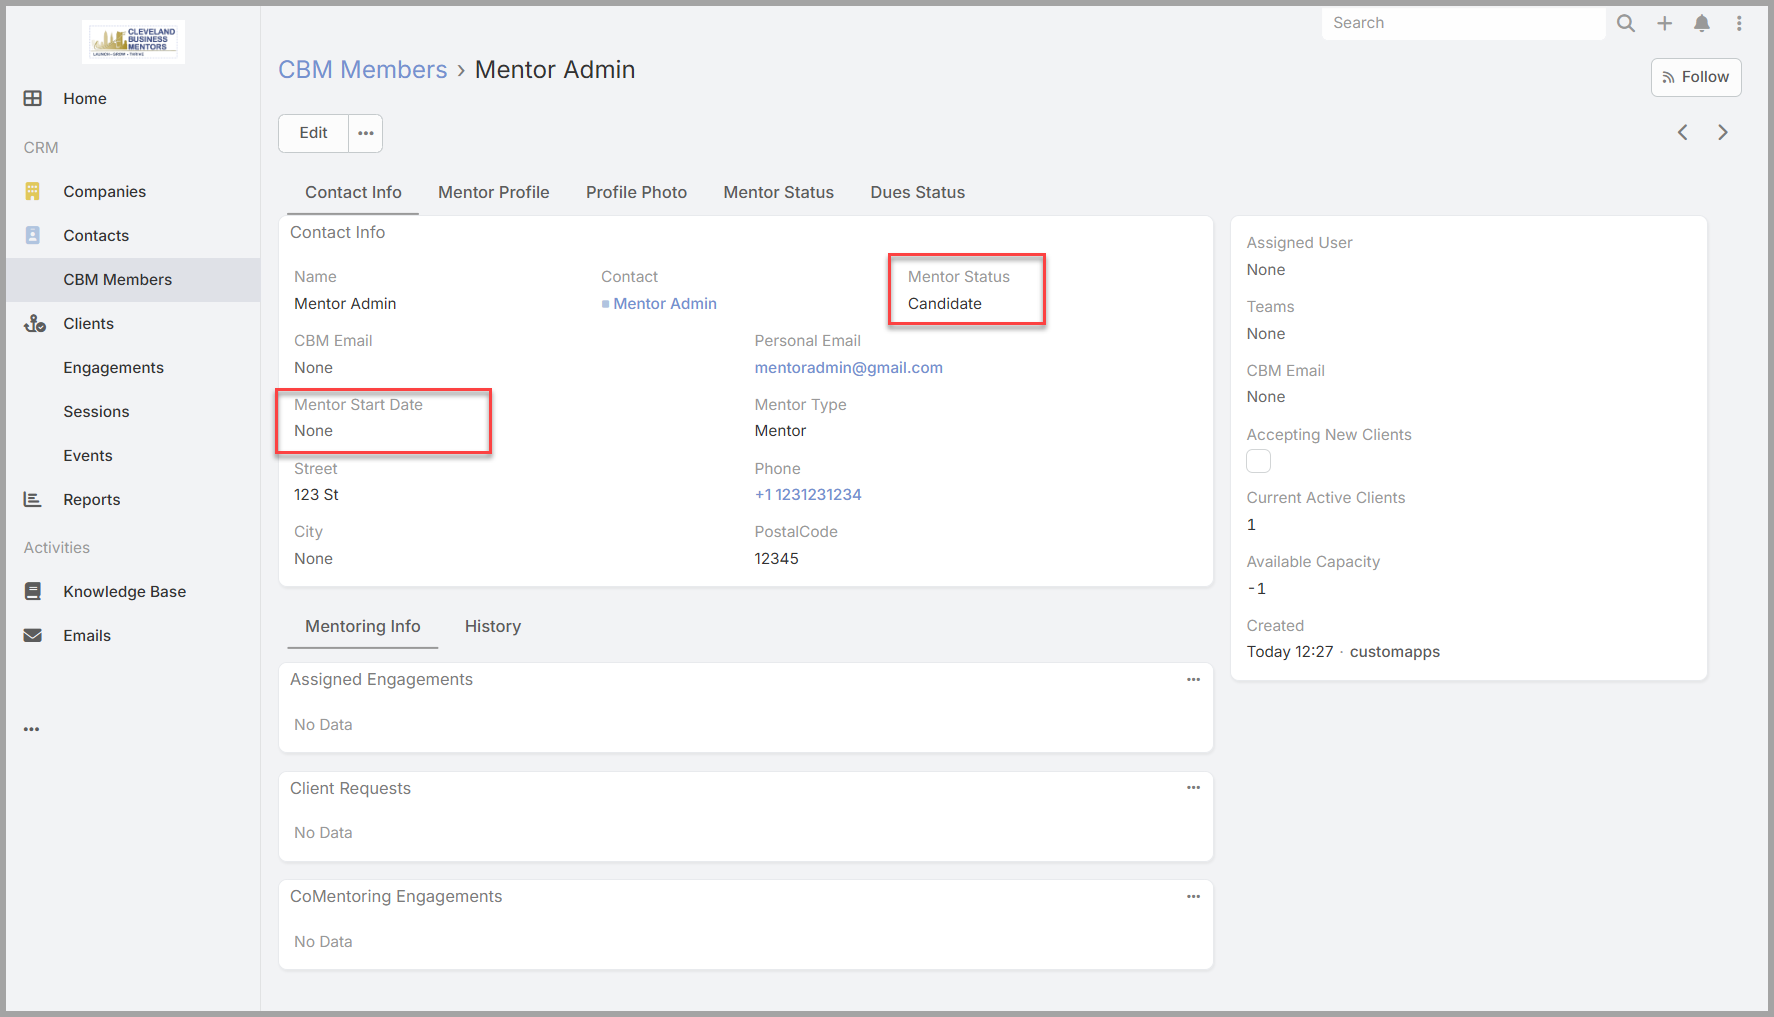
- Provisional → Approved.The candidate has been accepted as a CBM mentor. This is your team’s final decision. When you set status to Approved, also set the Mentor Start Date field to today’s date — this records when the candidate was formally accepted into the program.
- Approved → Active.The candidate is accepting solo mentoring sessions from the Client Assignment Team.
Setting the Mentor Start Date. The Mentor Start Date is set at the same time you move status to Approved. It’s on the CBM Member record alongside the Mentor Status field — set both in the same edit and save together.
Declining an Application
When to decline. If after a full review your team determines that a candidate is not the right fit for CBM’s mentoring program, you decline the application. A declined record is retained permanently in the system — it isn’t deleted.
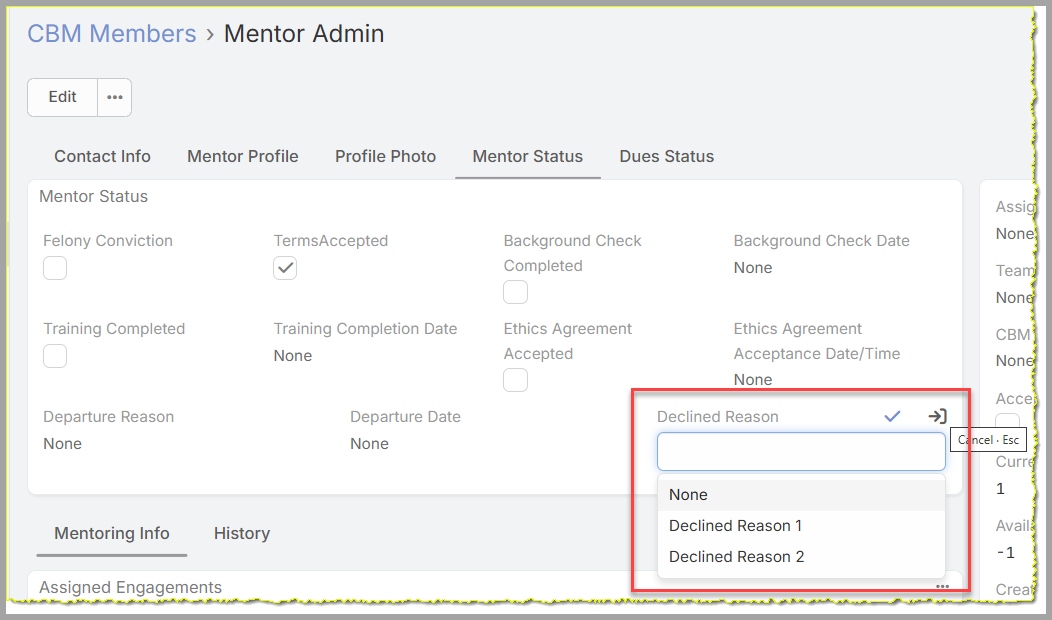
How to decline. To record a decline decision:
- Open the CBM Member record from the dashlet or from the CBM Members list.
- Select Edit.
- Set Mentor Status to Declined.
- Select an Application Decline Reason from the dropdown — this field is required when declining and becomes part of the permanent record.
- Select Save.
Notifying the applicant. The system does not send an automatic notification when an application is declined. After saving, you are responsible for contacting the applicant directly to let them know the outcome. This is done outside the CRM — by email or phone — and the content and tone of that communication is at your team’s discretion.
The record after a decline. The Contact and CBM Member records remain in the system with Mentor Status = Declined. If a declined applicant attempts to reapply through the website form using the same email address, the system will detect the existing record and block the submission, alerting the Mentor Administrator to handle it manually.
After Approval — What Happens Next
Your decision hands off to onboarding. When you set a candidate’s Mentor Status to Approved and save the record, your team’s work on that application is complete. The candidate moves into the CBM mentor onboarding process — a separate workflow handled by the Mentor Administration team that carries them through the remaining steps before they begin mentoring.
What onboarding covers. Onboarding takes an Approved mentor through the practical steps of joining CBM — things like training, background check, ethics agreement, and setting up their CRM access. When onboarding is complete, the mentor’s status moves from Approved to Active.
When the mentor becomes available for client assignment. An approved mentor does not appear in the Client Assignment team’s mentor pool until their status reaches Active. The Client Assignment team looks across the CBM Members area for mentors who are open to new clients — only Active mentors with available capacity show up for matching. Your approval decision starts that path; onboarding completes it.
Dormant mentors in your queue. Your dashlet also surfaces mentors with a status of Dormant — previously Active mentors who have become inactive. If a dormant mentor is ready to return, your team can advance their status back toward Active through the same progression. If they are not returning, no action is required and the record remains as is.
The following steps should be taken in the CRM:
- Change Mentor Status to “Approved”
- Create a email account in the Google Workspace system.
- Create a User in the CRM System using the new email as the username.
- Username – CBM email addressed
- Password - <assign a temporary password and include it in email>
- Add the new User to the “Mentor Team” team.
- Set the Assigned User on the new Mentor’s CRM Member record to the new CRM User.
- Send the new Mentor a welcome email.
Dormant Mentors
The system defines a Dormant Mentor as a Mentor who has not accepted Client Assignments or has gone unresponsive. There is no automation to determine this status, so it is a Administrator assigned status used to prevent the Client Assignment Team from assigning Clients to a Dormant Mentor.
Dormant Mentors will be listed in the Dashboard Dashlet. If a Dormant Mentor is ready to return, your Mentor Admin Team can change their status back toward Active through the same progression. If they are not returning, no action is required and the record remains as is.
Getting Help and Next Steps
Where to get help. For anything about access — signing in, your password, or not being able to see the dashlet or a record you think you need — contact Sharon Rose [contact method to be added]. For questions about how to do your work — which status to use, how to handle an unusual application, or what a field means — your lead or a colleague on the Mentor Applicant Review Team is usually the fastest source.
Your workflow at a glance. Working from the Mentor Applicant Review dashlet, you find applications at Candidate status and review the Mentor Profile tab — Professional Bio, Area of Expertise, Mentoring Skills, and the other fields the candidate submitted (Section 3). You move candidates forward through Candidate → Provisional → Approved, setting the Mentor Start Date when you approve (Section 4). If a candidate isn’t the right fit, you set status to Declined, record the Application Decline Reason, and notify the applicant directly (Section 5). Approved candidates move into onboarding and become available to the Client Assignment team once they reach Active status (Section 6).
Keep the Introduction handy. This guide builds on the CRM Introduction — what the records are, how to navigate, and why your view is tailored to your role. Keep it nearby as a refresher whenever a term or screen is unfamiliar.
Thank you. The mentors you approve are the foundation of everything CBM does for its clients. The care your team puts into reviewing each application is what ensures CBM’s mentor roster stays strong — thank you.