# CBM Mentor Guide
# Getting Started as a Mentor
## 1. Getting Started as a Mentor
#### *Who this guide is for.*
This guide is for CBM mentors, and it assumes you've already read the CRM Introduction — so you know what Contacts, Companies, Engagements, and Sessions are, how to sign in and find your way around, and that what you can see is governed by your User account. This guide picks up from there and walks you through what you actually do as a mentor.
#### *What's expected of you.*
The CRM is where your mentoring is recorded. In practice that comes down to a few things: finding the clients you're assigned to, logging each session after you meet, following up with the people you mentored, and keeping your engagement and your own profile current. The sections that follow take these one at a time.
#### *Signing in.*
You reach the CRM the same way as any user — see "Signing In" in the Introduction. As a mentor you have a User account for logging in; if you're ever unable to sign in, contact **Sharon Rose** \[contact method to be added\].
*Your CBM Member profile.* Your information lives on the **CBM Members** tab — this is your CBM Member profile. It holds the details CBM uses to match you well and stay in touch: your **availability**, your **focus / expertise areas**, your **capacity** (how many engagements you can take on at once), and a short **bio**. Keeping these current helps coordinators pair you with the right clients.
### To update your profile:
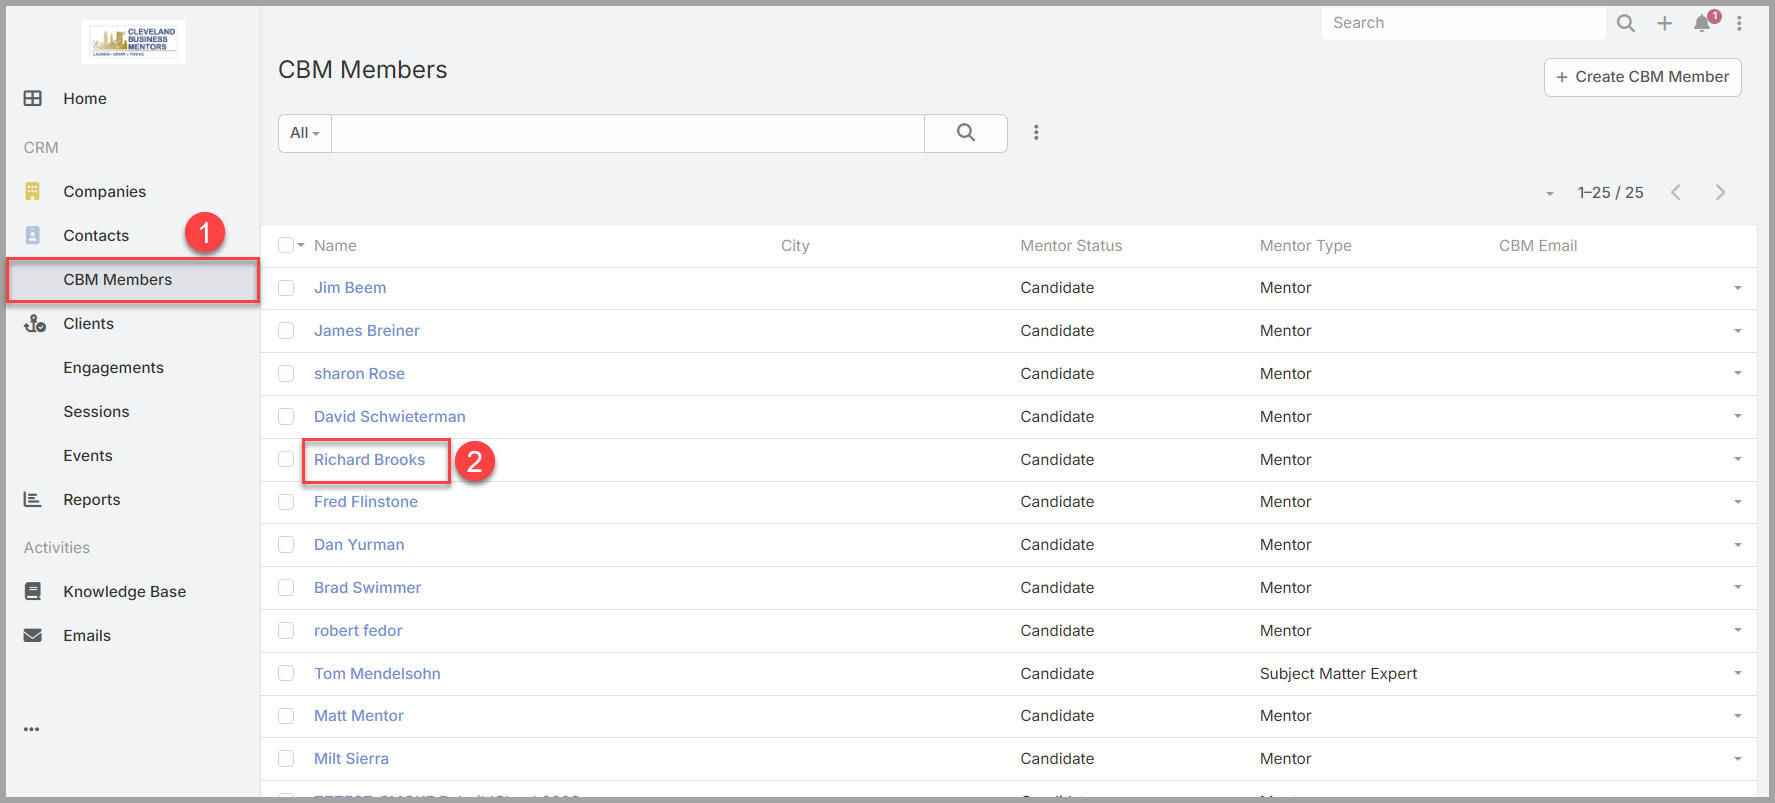
1. Open your own member record — search your name, or find yourself on the **CBM Members** tab.
1. Click on the Members Name to display the Mentor Details page.
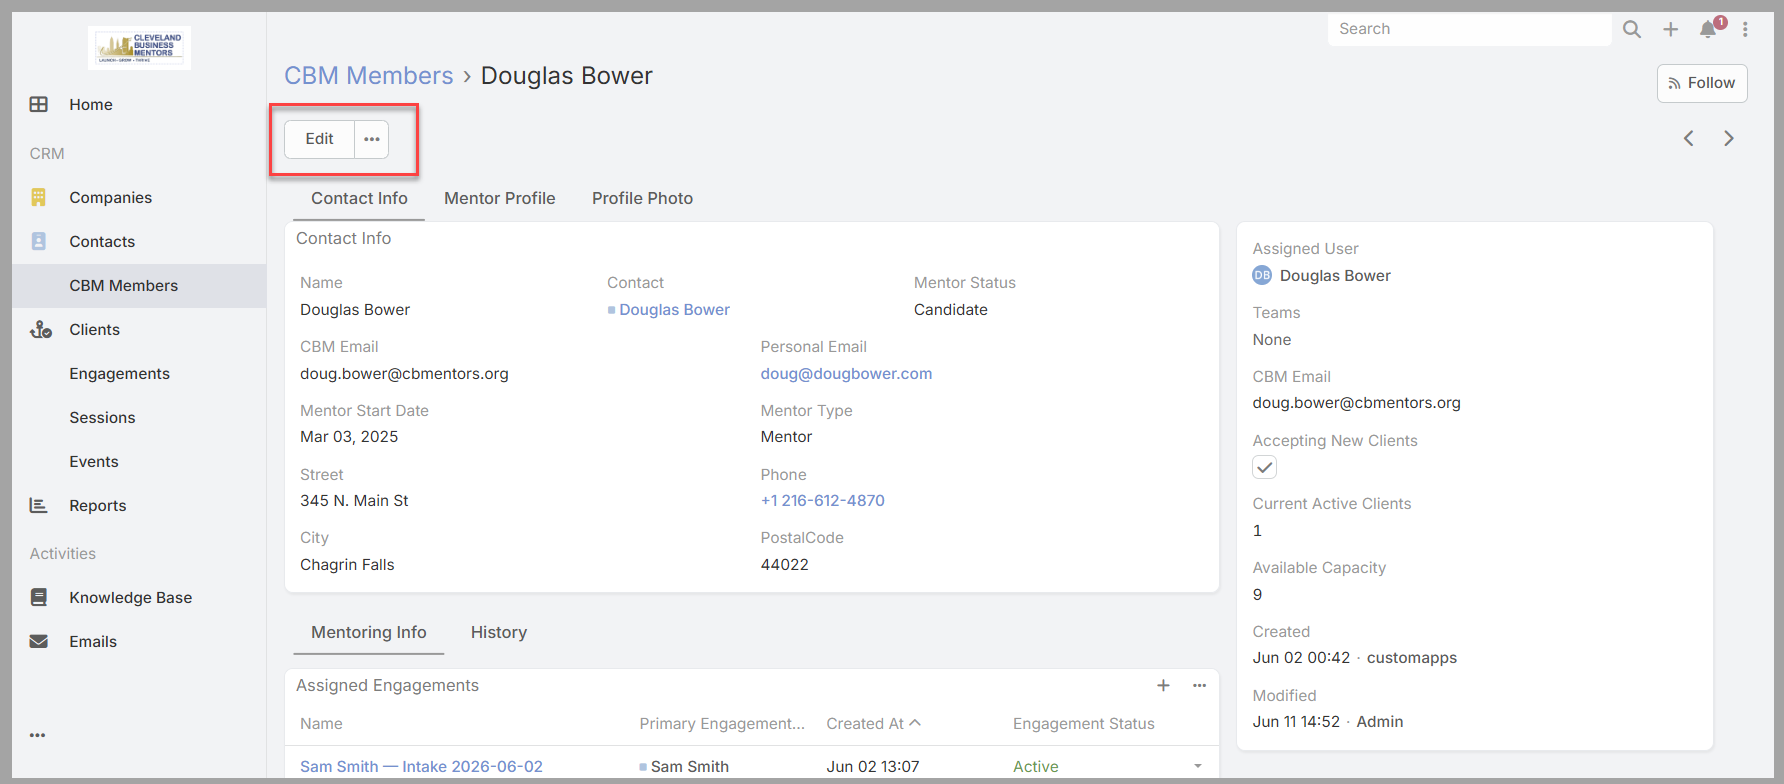
1. Click on the **Edit** button in the upper left of the screen.
1. Update your availability, focus areas, capacity, or bio.
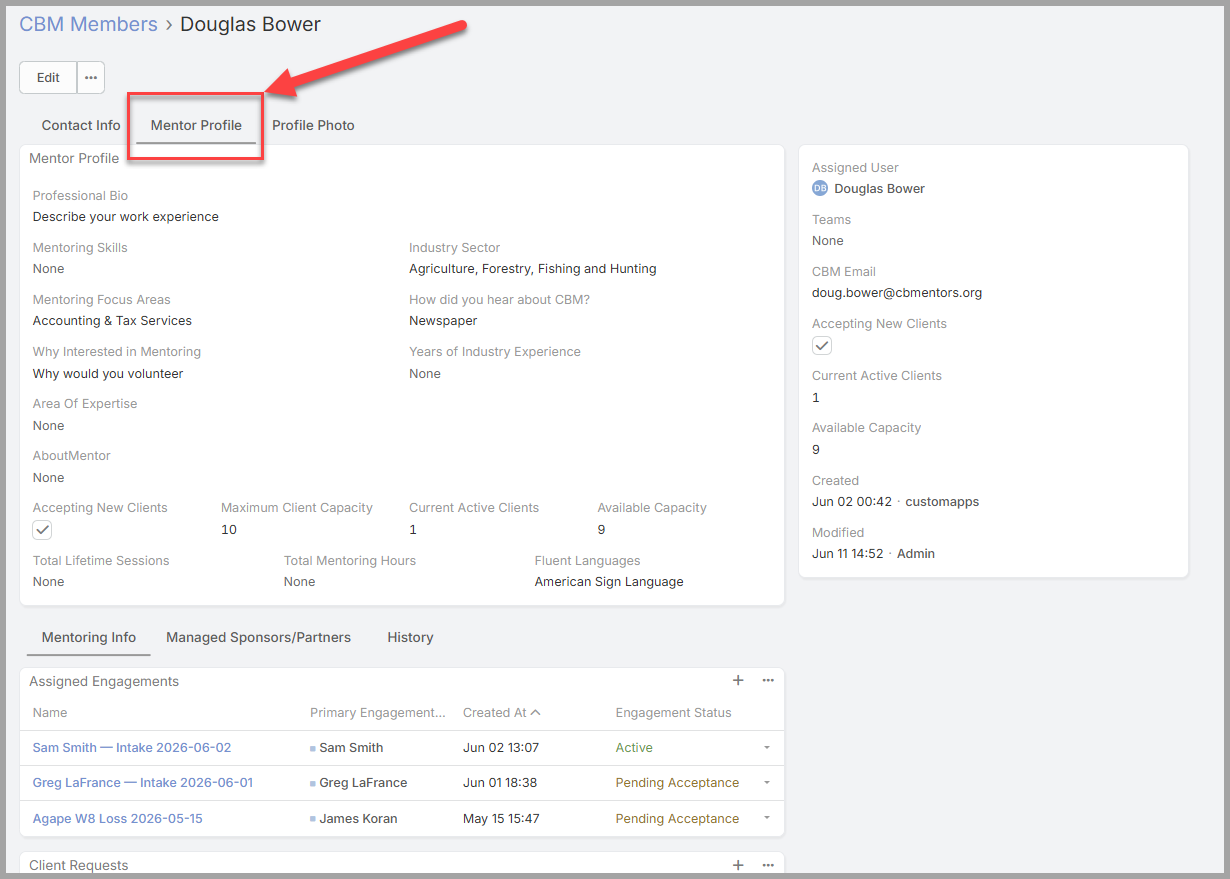
1. Click on the tabs to gain access to Mentor Profile or Photo information
1. Select **Save**.
Your updates are visible to coordinators right away, so it's worth revisiting your profile whenever your availability or focus changes.
[](https://docs.clevelandbusinessmentors.org/uploads/images/gallery/2026-06/o1Timage.png)
[](https://docs.clevelandbusinessmentors.org/uploads/images/gallery/2026-06/6CCimage.png)
[](https://docs.clevelandbusinessmentors.org/uploads/images/gallery/2026-06/3mdimage.png)
# Finding Your Engagements
## 2. Finding Your Engagements
*Two ways to reach your work.* There are two routes to the engagements you're working on, and both show the same list:
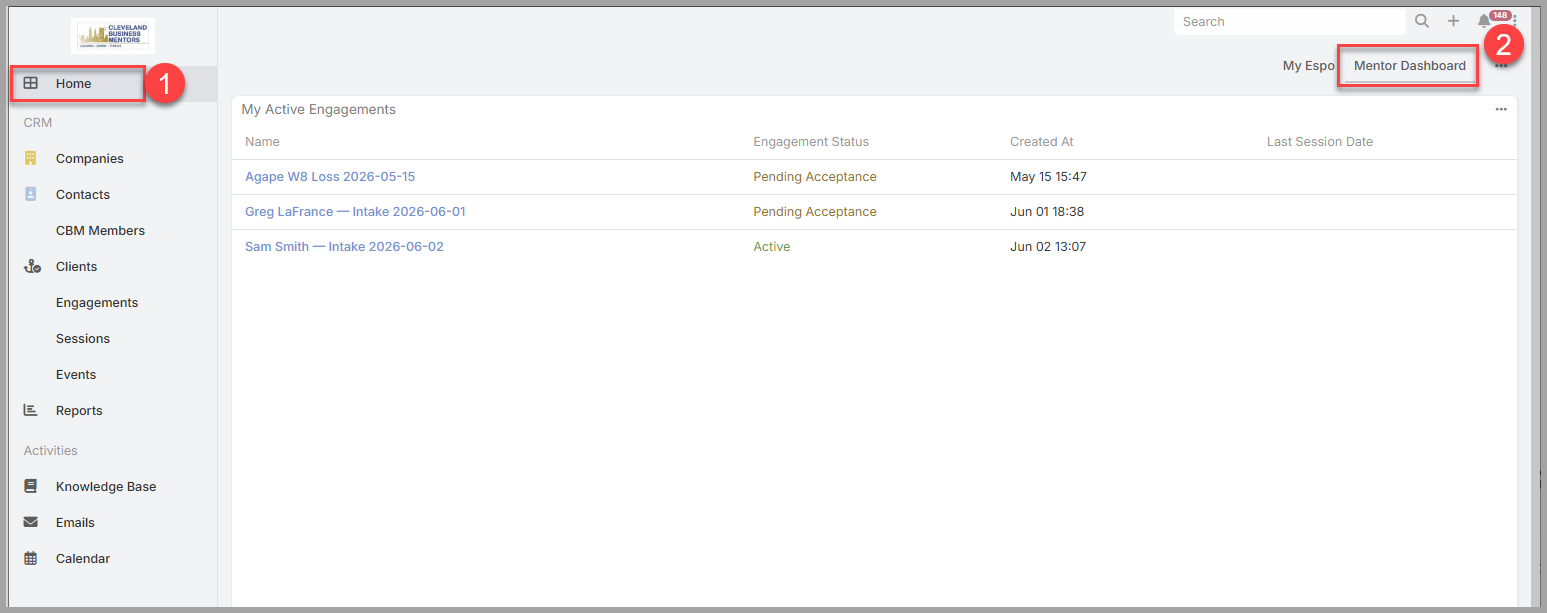
- From your **home page** (the **Mentor Dashboard**), the **My Active Engagements** dashlet lists your current engagements.
- From the **left-hand menu**, open **Engagements** for the same list.
Either way, you get the engagements you're assigned to — whether you're the primary mentor or a co-mentor.
*Opening an engagement.* Select an engagement's name to open it. (For a refresher on reading a record — its panels, tabs, and Stream — see "Finding and Reading Information" in the Introduction.)
*What an engagement shows you.* Each engagement gathers the whole mentoring relationship in one place:
- the **client company** you're helping;
- the **people you're mentoring** — the client's employees named on the engagement;
- your **co-mentors**, if any;
- the engagement's **status** and **meeting cadence**;
- the **Sessions** logged so far, which build the history of your work together.
*Two kinds of engagements.* Your list holds two kinds:
- **Existing engagements** — the ones you're already working on.
- **Pending Acceptance engagements** — new assignments the system has given you, waiting on your decision. They appear right in your engagements list, marked **Pending Acceptance**, so a new one is easy to spot.
*Accepting or declining a new assignment.* New engagements are assigned to mentors automatically, so from time to time a **Pending Acceptance** engagement will turn up in your list. When one does:
1. Open it and review the client and the work against your **focus and expertise areas** — is it a good fit?
1. If it is, **accept** it by setting the engagement **status** to **Assigned** (you've taken it on, but haven't contacted the client yet).
1. If it isn't, **decline** it by setting the status to **Assignment Declined**.
Once you accept, the engagement is yours. After your first meeting — when you log that first session — set the status to **Active** to show the work is underway (Section 3).
*Get oriented before each session.* Before you meet, it's worth opening the engagement to review the client, your notes from last time, and the action items you set — so you pick up right where you left off. The next sections cover logging the session and following up.
[](https://docs.clevelandbusinessmentors.org/uploads/images/gallery/2026-06/mfoimage.png)
*Your My Active Engagements dashlet on the Mentor Dashboard, showing Pending Acceptance and Active engagements together. Click the Engagement Name to view the details.*
[](https://docs.clevelandbusinessmentors.org/uploads/images/gallery/2026-06/hI9image.png)
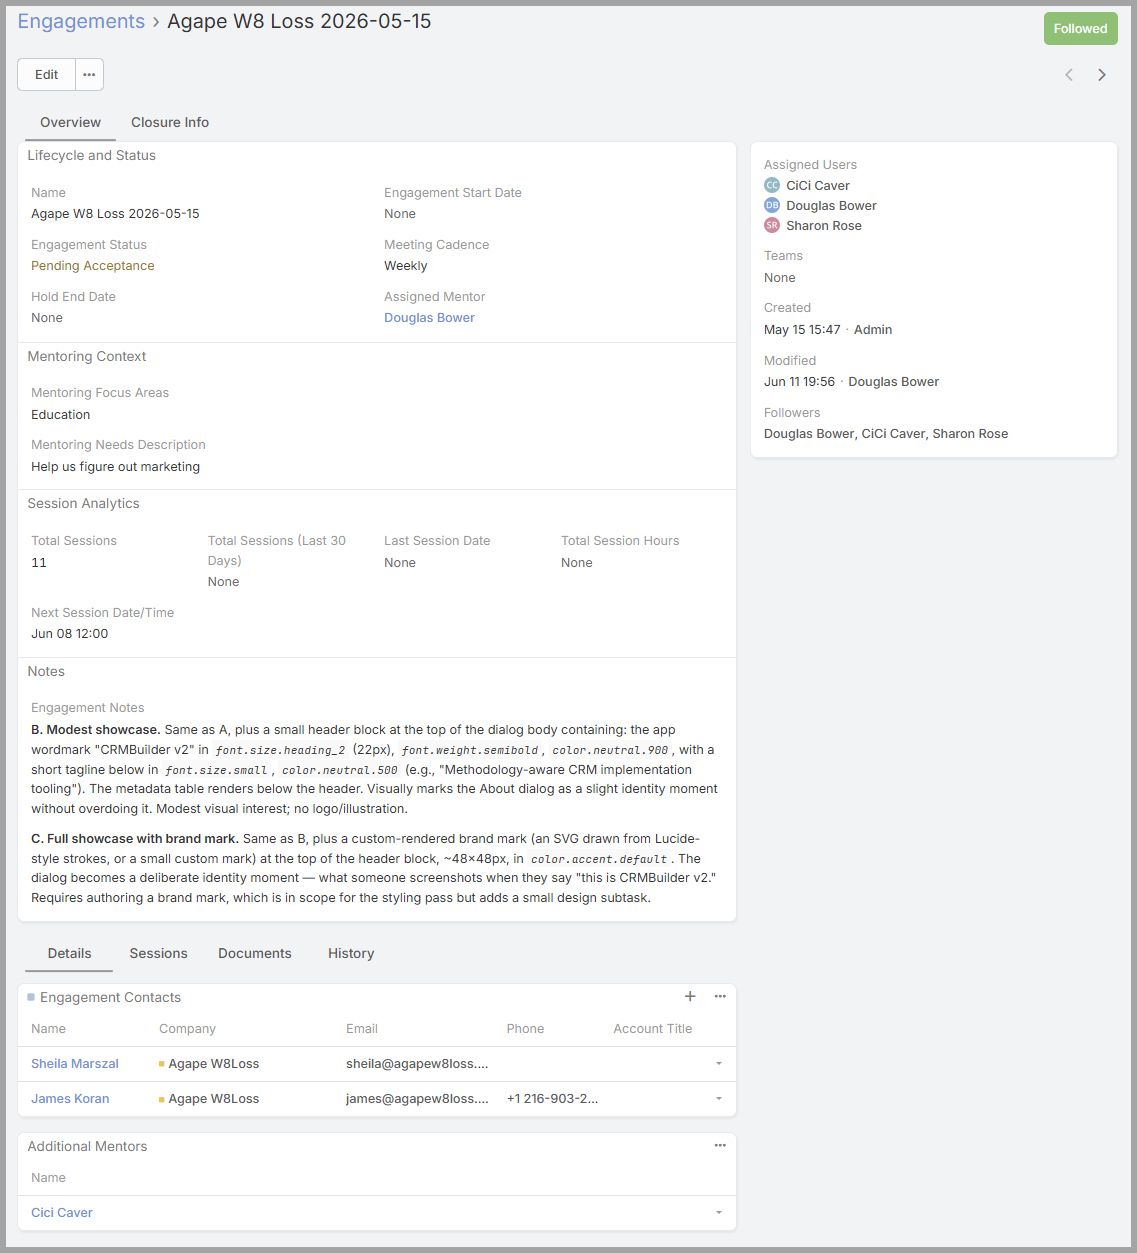
*An opened engagement Details Screen — its status and assigned mentor/users, the client's focus areas, the Engagement Contacts, and any additional (co-)mentors.*
# Logging A Client Session
## 3. Logging a Session
After every mentoring meeting, log a Session. This is the heart of your work in the CRM: it builds the running record of the engagement and feeds the follow-up you send to attendees (Section 4). Log it while the meeting is still fresh.
*Where a session lives.* A Session always belongs to an Engagement, so you create it from inside the engagement and it attaches there automatically.
*Logging a session, step by step.*
1. Open the appropriate **Engagement** **Details**. (See Section 2)
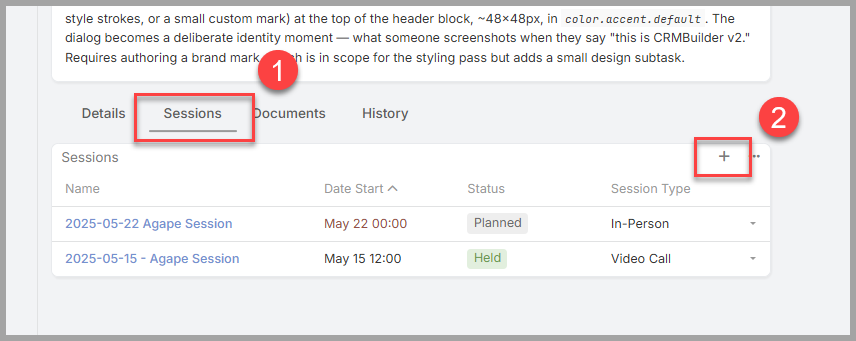
2. Open the **Sessions** panel, and press the **“+”** button to add a new session.
1. The first screen shown is a summary screen. If you want to add more details, press the “Full Form” button to add additional information.
3. You should NOT enter a **Name**. It will be assigned automatically.
4. Set the session **Date Start** — the day you met.
5. Record **who attended** — the client employees who were present, and any co-mentors who joined you.
6. Write your **Session Notes** — what you covered, what was decided, and the progress since last time.
7. List the action items for next session in the **Next Steps** field— what the client will work on, and anything you'll prepare.
8. If you set a follow-on session enter the date in the **Next Session Date**.
9. Select **Save**.
The session is named automatically (date – engagement – mentor) and added to the engagement's **Sessions** panel, joining the history of your work together.
*Your first session on an engagement?* After saving, set the engagement **status** to **Active** — that moves it on from **Assigned** and marks the work as underway.
*Why notes and action items matter.* Good notes pull double duty — they give a coordinator or another mentor a clear picture if anyone ever needs to step in, and they become the summary you send to attendees right after the meeting (Section 4). Clear action items mean everyone leaves knowing what happens next.
[](https://docs.clevelandbusinessmentors.org/uploads/images/gallery/2026-06/i7Wimage.png)
*From the engagement's Sessions panel, select + to add a session.*
[](https://docs.clevelandbusinessmentors.org/uploads/images/gallery/2026-06/RLoimage.png)
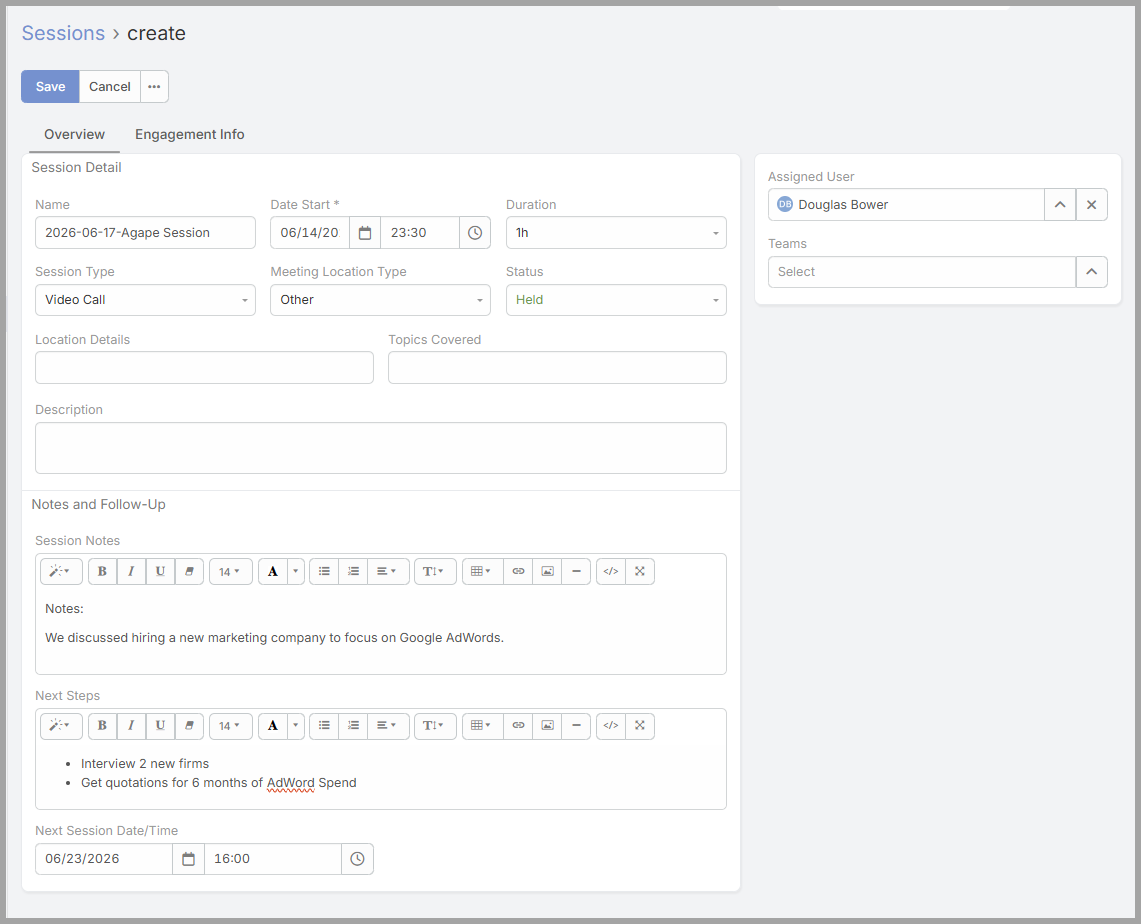
*The new Session form — date, your session notes, the next steps (action items), and the next session date.*
# Adding Attendees to a Session.
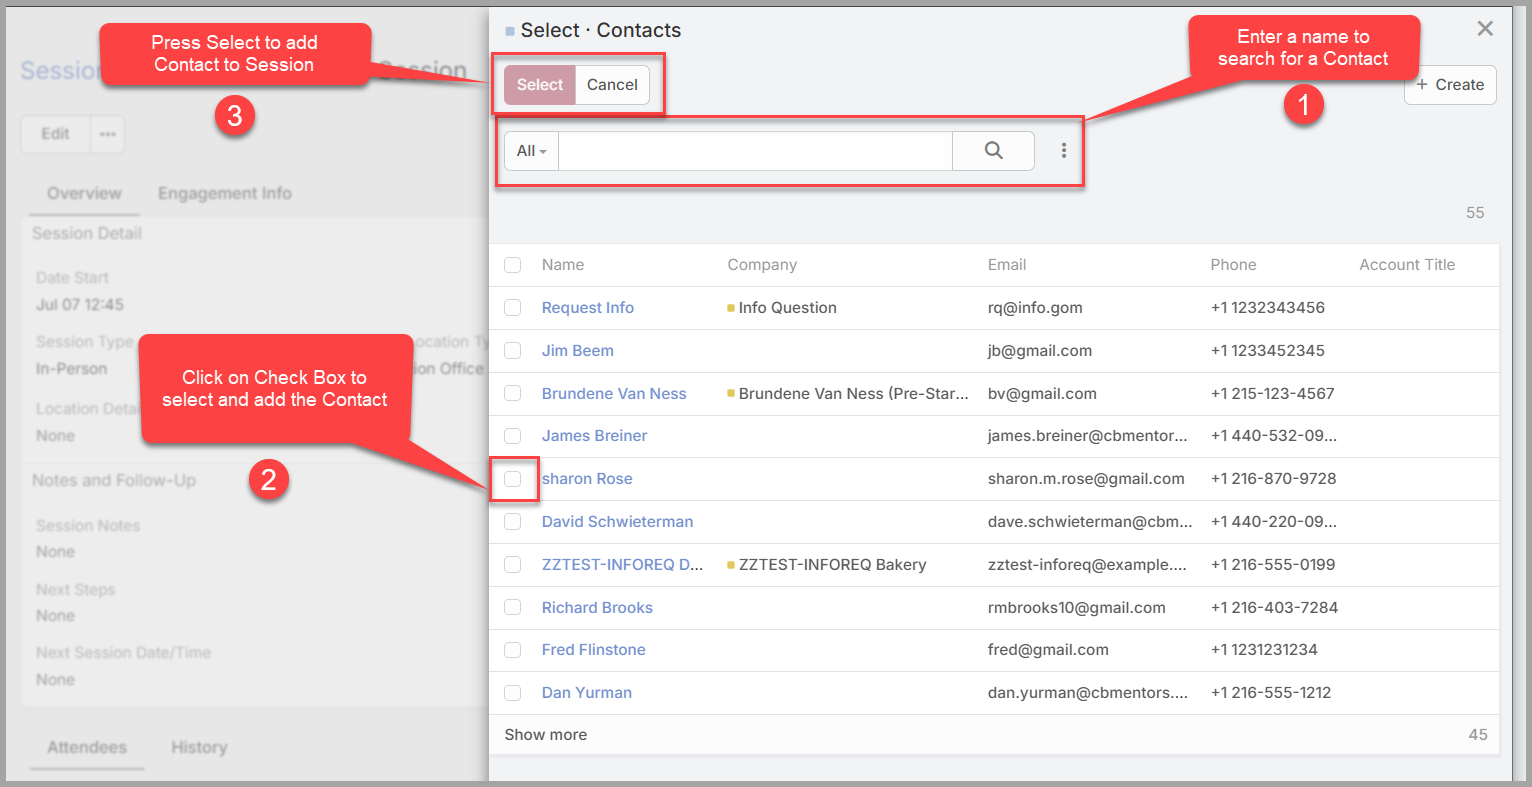
After a session is created, you can add the attendees to the session using the following steps:
1. Open the Session Details screen.
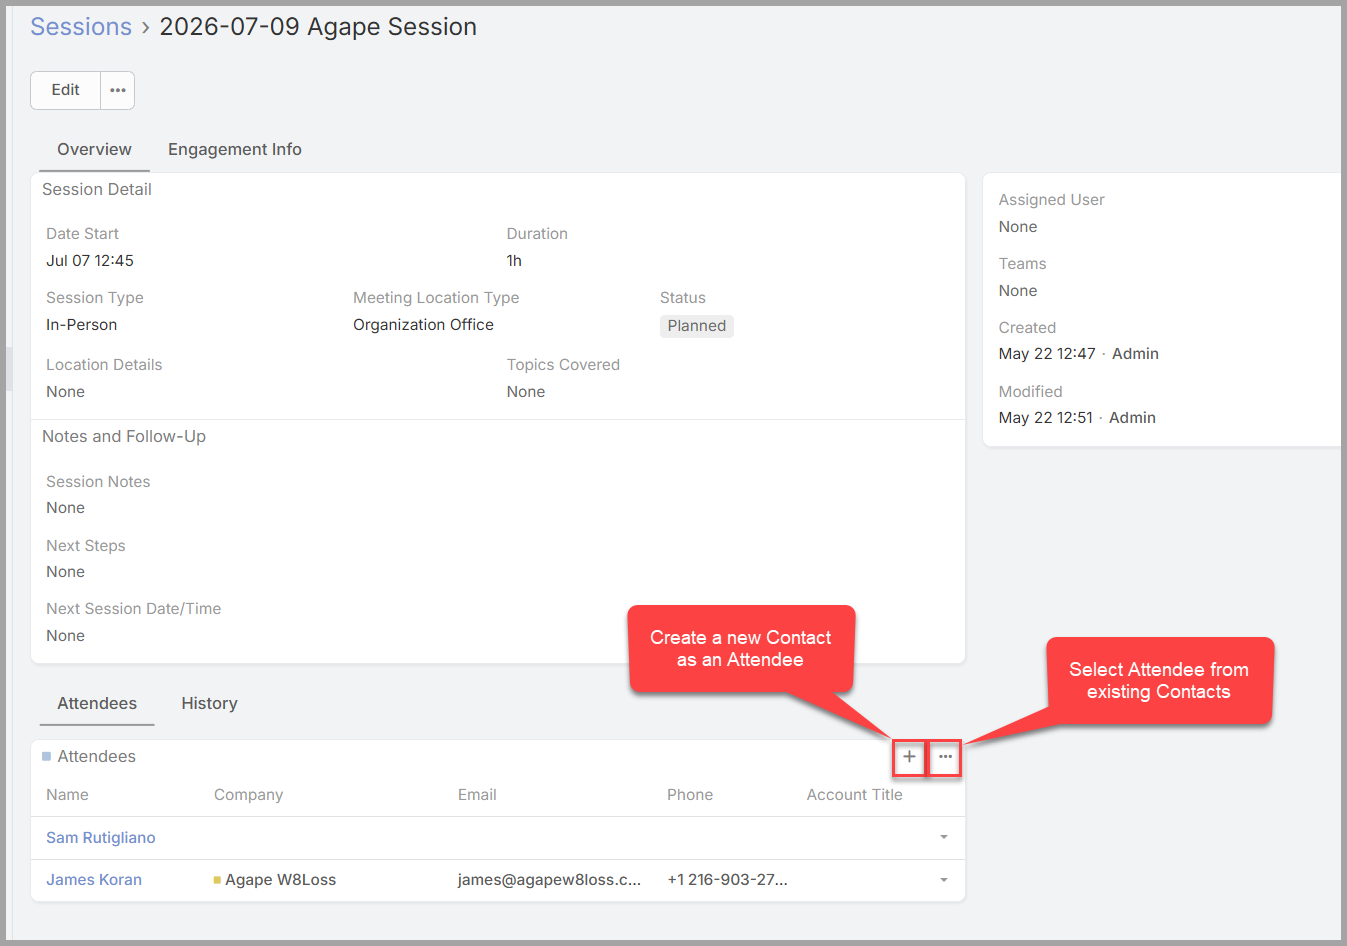
2. Click on the “+” button to create a new contact and add them as an attended.
3. Only do this if you have not added the contact previously. Otherwise, it will create a duplicate contact.
4. Click on the “…” button to select from existing contacts.
[](https://docs.clevelandbusinessmentors.org/uploads/images/gallery/2026-06/L4wimage.png)
[](https://docs.clevelandbusinessmentors.org/uploads/images/gallery/2026-06/jl9image.png)
# Following Up After a Session
Once you've logged the session (Section 3), close the loop with the client: send them a recap of what you discussed and lock in the next meeting. Unlike the rest of this guide, **this step happens in your Google Calendar and email, not in the CRM** — the CRM holds the record; the follow-up goes to the client through your calendar.
By this point you'll usually have agreed on the next session date during the call, and you'll already have entered it on the session record (Section 3).
*Sending the summary and the next-session invite.*
1. Open your **Google Calendar**.
2. Create a **new meeting request** for the agreed next-session date and time.
3. Add the client — and any other attendees — as guests, so they receive the invitation.
4. Include the link to your **online meeting tool** (Zoom or Google Meet) so everyone can join.
5. **Attach your session summary** — the notes and action items you recorded — so the client leaves with a clear recap.
6. Send the invitation.
[](https://docs.clevelandbusinessmentors.org/uploads/images/gallery/2026-06/HDaimage.png)
The client receives one message that recaps the last session, sets the next one, and carries the link they'll need to join.
*Keep the rhythm.* Doing this right after you log the session — summary and next invite together — keeps the cadence clear for the client and makes sure nothing slips between meetings.
# Keeping Your Engagement Current
Most of your record-keeping happens session by session (Section 3). Between sessions, there are two things you may want to keep up to date on the engagement itself — its status and any notes — and both are largely at your discretion.
*Status.* An engagement stays **Active** while you're working with the client. You can change that when the situation shifts:
- Move it to **On Hold** if the mentoring pauses for a while.
- Move it to **Complete** when the engagement has run its course.
This is your call as the mentor, and updating it keeps coordinators informed about where the relationship stands. To change it: open the engagement, select **Edit**, set the **Engagement Status**, and **Save**.
[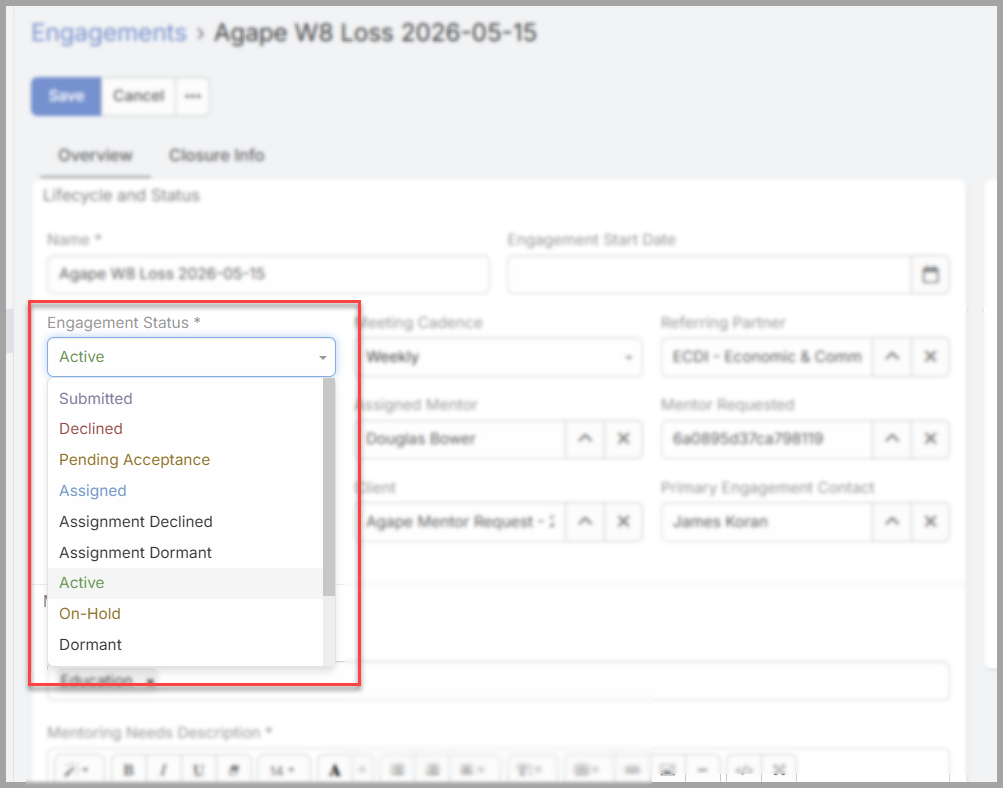](https://docs.clevelandbusinessmentors.org/uploads/images/gallery/2026-06/aHoimage.png)
*Notes.* Where you keep your notes is up to you. You can record developments on the **engagement** itself, or keep them on the individual **Sessions** as you go. Either works — choose whatever keeps your record clear and easy to pick up later. Many mentors keep the meeting-by-meeting detail on the Sessions and use the engagement only for the bigger picture.
[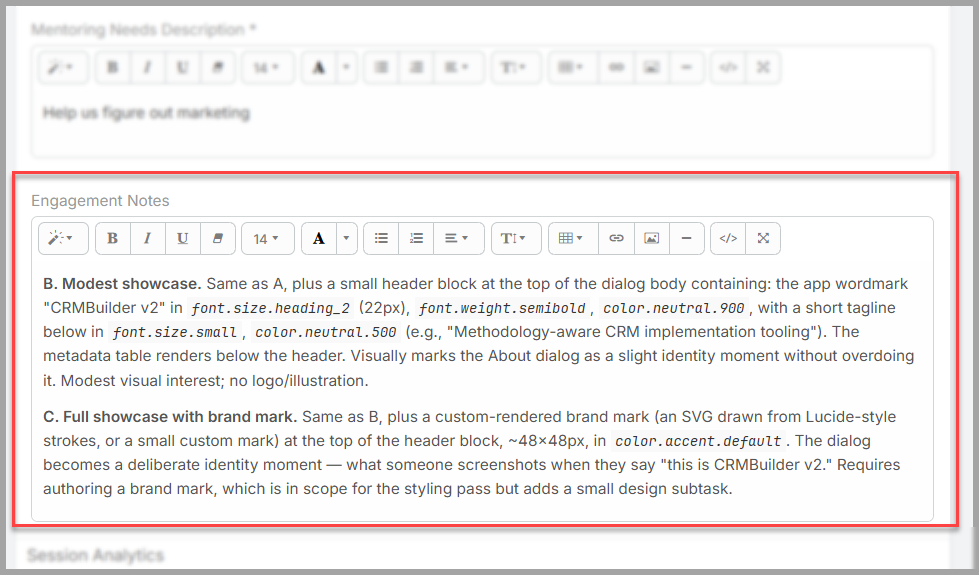](https://docs.clevelandbusinessmentors.org/uploads/images/gallery/2026-06/r3Zimage.png)
*Adding a co-mentor, or stepping off an engagement.* You can also change who's mentoring an engagement. To bring in a **co-mentor**, add them to the engagement's **Assigned Mentor** and **Assigned Users** fields; for them to see the client's people and record, they'll also need to be the **Assigned User** on the engagement's contacts and the client (your Client Assignment team can help with this). To **step off** an engagement and hand it to someone else, remove yourself from those fields once another mentor is in place — that transfers the client to them.
*In short.* Move an engagement to On Hold or Complete when the situation calls for it, and keep your notes wherever suits you — on the engagement or on its Sessions. The aim is simply a record that you, a coordinator, or another mentor could pick up and understand.
# Tracking Upcoming Sessions
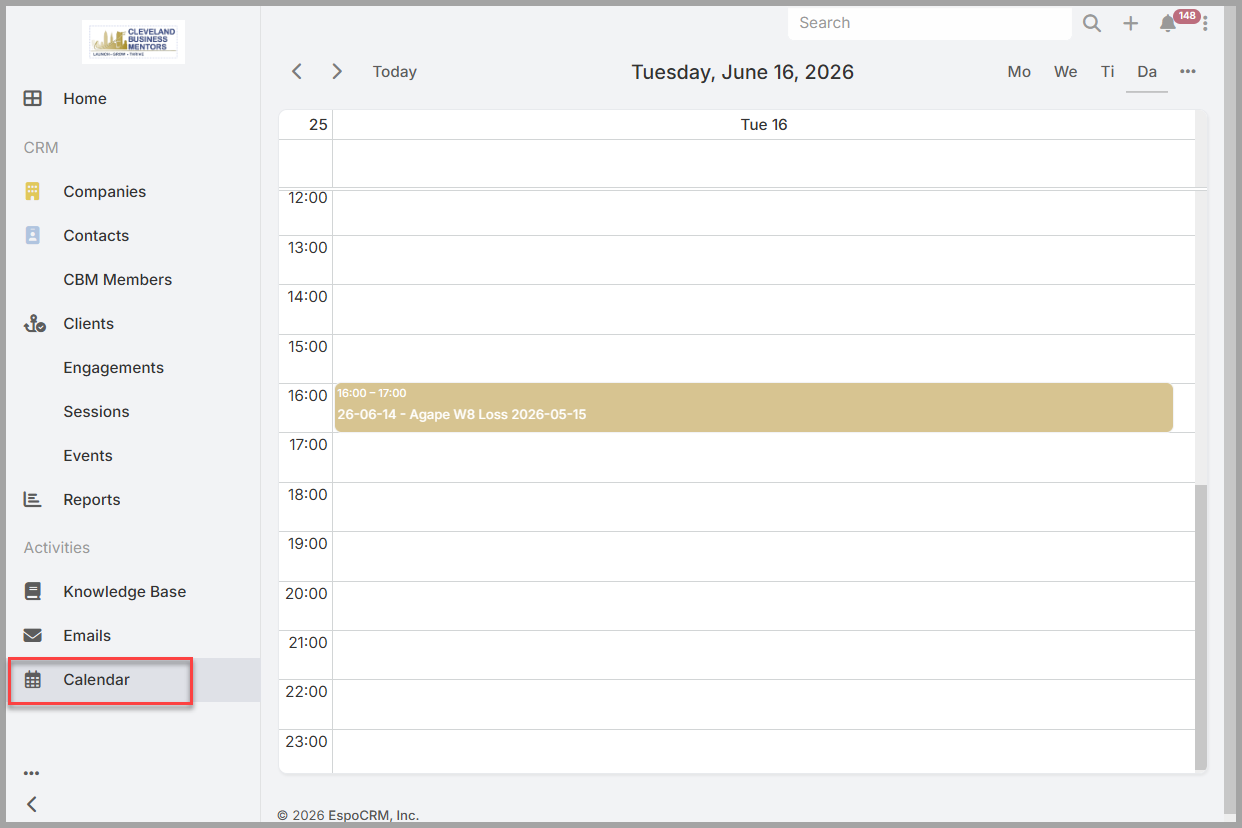
*One place for what's coming up.* The CRM has its own **Calendar**, reached from the left-hand menu, and it's linked to your Google Calendar. That means the next-session meetings you create in Google Calendar (Section 4) appear here too — so you can see your upcoming sessions inside the CRM without switching tools.
*Using the calendar.* Open **Calendar** from the left-hand menu to see your scheduled sessions laid out by day, week, or month. Select any entry to see its details — when it is, who's invited, and the meeting link. Because the CRM Calendar and your Google Calendar stay in step, anything scheduled in one shows up in the other, giving you a single reliable picture of what's ahead.
*Staying on top of your engagements.* Glance at the week to confirm your next sessions are on the books and that nothing has slipped — especially right after you've logged a session and sent the next invite (Sections 3–4).
[](https://docs.clevelandbusinessmentors.org/uploads/images/gallery/2026-06/B15image.png)
*he CRM Calendar — your scheduled sessions, kept in step with Google Calendar.*
# NewGetting Help and Next Steps Page
*Where to get help.* For anything about **access** — signing in, your password, or not being able to see something you think you need — contact **Sharon Rose** \[contact method to be added\]. For questions about **how to do your work** — a process, who handles what, or a client situation — your **coordinator** is usually the fastest source.
*Your workflow at a glance.* You now have the full loop: find your engagements (Section 2), log each session with notes and action items (Section 3), follow up with the client through Google Calendar (Section 4), keep your engagement current (Section 5), and track what's ahead on the calendar (Section 6). Done consistently, these few habits keep your mentoring clear for you, for your client, and for anyone at CBM who may need the picture.
*Keep the Introduction handy.* This guide builds on the CRM Introduction — what the records are, how to navigate, and why your view is tailored to your role. Keep it nearby as a refresher whenever a term or screen is unfamiliar.
*Thank you.* Your time as a mentor is what makes CBM's work possible. Keeping your record current is a small part of that, but it's what lets the whole team support you and your client well — thank you.